Visual Studio C#を使ってSqliteデータベースを使う手っ取り早い方法
私はプログラミングでデーターベースを使うことがあまり多くないので、いつもそのたびにどうするんだったかな・・・と、いつも復習して始めなければならなかった。
しかし、C#でオーソドックスな方法でSqliteを使う事は簡単なので覚書として残しておこうと思う。
今回はWindows フォームアプリケーション(.NET Freamwork)のプロジェクトを予め作成しておきます。
作成したら、NuGetパッケージマネージャーから「ソリューションのNuGetパッケージの管理」を選び
参照タブから検索窓で「System.Data.SQLite.Core」を選択してプロジェクトにインストールします。
これだけでSQliteは割と自由に使えるのだから便利なもんです。
実際の使いかた
まずは、コードの頭で usingで System.Data.SQLite のパッケージを指定して使えるようにします。
using System.Data.SQLite;使うSQLiteのDB本体のファイル名をFormの最初に記述します。
とりあえずファイル名は test.dbとしておきます。
public partial class Form1 : Form
{
    private static string dbConnectionString = "Data Source=test.db;Version=3;";

・・・・
次にデータベースのテーブルを作ります。
DBファイルを予め作っておかなくても無ければ作成する。という様な動作をするSQL文を作っておけば手間がかかりません。
SQL文は ”CREATE TABLE IF NOT EXISTS”を使います。
練習用なので、テーブル構造はとりあえず id, name, age の三つにすることにします。
実際のコードは以下の様に CreateDB() にまとめ、Formの起動の最初のほうに呼び出しておけばOK。
データファイルは無ければ作成されます。
public partial class Form1 : Form
{
    private static string dbConnectionString = "Data Source=test.db;Version=3;";

    private void CreateDB()
    {
        try
        {
            using (SQLiteConnection connection = new SQLiteConnection(dbConnectionString))
            {
                connection.Open();
                string sql = "CREATE TABLE IF NOT EXISTS users (id INTEGER PRIMARY KEY AUTOINCREMENT, name TEXT, age INTEGER)";
                using (SQLiteCommand cmd = new SQLiteCommand(sql, connection))
                {
                    cmd.ExecuteNonQuery();
                }
                // connection.Dispose(); これはusingで自動的に閉じられるので不要なのでコメントアウト
            }
        }
        catch (Exception ex)
        {
            MessageBox.Show("Error creating database: " + ex.Message);
        }
    }

    public Form1()
    {
        InitializeComponent();
        CreateDB();
    }

   ・・・・
}
次にデータの追加です。
name と age を指定して追加すればよい(idは自動で付く)ので メソッドInsertData()を作ります。
private void InsertData(string name, int age)
{
    try
    {
        using (SQLiteConnection connection = new SQLiteConnection(dbConnectionString))
        {
            connection.Open();
            string sql = "INSERT INTO users (name, age) VALUES (@name, @age)";

            using (SQLiteCommand cmd = new SQLiteCommand(sql, connection))
            {
                cmd.Parameters.AddWithValue("@name", name);
                cmd.Parameters.AddWithValue("@age", age);
                cmd.ExecuteNonQuery();
            }
            // connection.Dispose(); これはusingで自動的に閉じられるので不要なのでコメントアウト
        }
    }
    catch (Exception ex)
    {
        MessageBox.Show("Error inserting data: " + ex.Message);
    }
    finally
    {
        ReadData(); // Refresh displayed data
    }
}
最後のほうにReadData(); というメソッドの呼び出しがあります。
これはDBデータを読み込んですべての要素を表示するメソッドです。
実際は何にデータを書き出すかによって変わってくるのですが、
今回はMultiline = True にして複数行表示出来るようにしたTextBoxを使う事にします。
そこに、直接データを吐き出します。
ReadData();の実例です。
private void ReadData() // Method to read and display all data in textBox1
{
    try
    {
        using (SQLiteConnection connection = new SQLiteConnection(dbConnectionString))
        {
            connection.Open();
            string sql = "SELECT * FROM users";
            using (SQLiteCommand cmd = new SQLiteCommand(sql, connection))
            {
                using (SQLiteDataReader reader = cmd.ExecuteReader())
                {
                    textBox1.Clear();
                    while (reader.Read())
                    {
                        textBox1.Text += $"ID: {reader["id"]}, Name: {reader["name"]}, Age: {reader["age"]}" + "\r\n";
                    }
                    // reader.Close(); // usingで自動的に閉じられるので不要
                }
            }
        }
    }
    catch (Exception ex)
    {
        MessageBox.Show("Error reading data: " + ex.Message);
    }

}
しかしこの様に直接結果をTextBoxに出力するのは、出力する相手が変わると何かと不便ですので
データをString ListとしてListに吐き出させるのも使いやすい方法の一手です。
private List<string> GetAllData() // Method to get all data as a list of strings
{
    List<string> dataList = new List<string>();
    try
    {
        using (SQLiteConnection connection = new SQLiteConnection(dbConnectionString))
        {
            connection.Open();
            string sql = "SELECT * FROM users";
            using (SQLiteCommand cmd = new SQLiteCommand(sql, connection))
            {
                using (SQLiteDataReader reader = cmd.ExecuteReader())
                {
                    while (reader.Read())
                    {
                        dataList.Add($"ID: {reader["id"]}, Name: {reader["name"]}, Age: {reader["age"]}");
                    }
                }
            }
        }
    }
    catch (Exception ex)
    {
        MessageBox.Show("Error getting all data: " + ex.Message);
    }
    return dataList; //Listとして返す
}
上記を使う場合は、たとえ同じTextBox1に書き出すにも以下のようにすればすっきりです。
// List<string>で全データを取得し、textBox1に表示する

List<string> allData = GetAllData();
textBox1.Clear();
foreach (var item in allData)
{
    textBox1.Text += item + "\r\n";
}
また、dataGridViewなどにデータを入れたいのであれば
まず全データをDataTableとして取得するメソッドGetDataTable()を作成します。
そして、それをdataGridView代入するメソッドSetDataGridView()を作りましょう。
これを必要な場所で呼べば、dataGridViewにデータを表示できます。
もっとも、これら二つをまとめて一つのメソッドにしてもよいかもしれません。
private DataTable GetDataTable() // DataTableに全データを取得するメソッド
{
    DataTable dt = new DataTable();
    try
    {
        using (SQLiteConnection connection = new SQLiteConnection(dbConnectionString))
        {
            connection.Open();
            string sql = "SELECT * FROM users";
            using (SQLiteCommand cmd = new SQLiteCommand(sql, connection))
            {
                // データを全件取得しadapterに入れる
                using (SQLiteDataAdapter adapter = new SQLiteDataAdapter(cmd))
                {
                    adapter.Fill(dt); // adapterからdtにデータを読み込む
                }
            }
        }
    }
    catch (Exception ex)
    {
        MessageBox.Show("Error getting data table: " + ex.Message);
    }
    return dt; // Return the filled DataTable
}

private void SetDataGridView() // DataGridViewに全データを表示するメソッド
{
    DataTable dt = GetDataTable(); // Get the DataTable with all data
    dataGridView1.DataSource = dt; // Set the DataTable as the DataSource for the DataGridView
}
idをキーにしてレコードを削除するには
private void DeleteData(int id)
{
    try
    {
        using (SQLiteConnection connection = new SQLiteConnection(dbConnectionString))
        {
            connection.Open();
            string sql = "DELETE FROM users WHERE id = @id";
            using (SQLiteCommand cmd = new SQLiteCommand(sql, connection))
            {
                cmd.Parameters.AddWithValue("@id", id);
                cmd.ExecuteNonQuery();
            }
        }
    }
    catch (Exception ex)
    {
        MessageBox.Show("Error deleting data: " + ex.Message);
    }
    finally
    {
        InpCls(); // Clear input fields after deletion
        ReadData(); // Refresh displayed data
    }
}
レコードの編集は
private void UpdateData(int id, string name, int age)
{
    try
    {
        using (SQLiteConnection connection = new SQLiteConnection(dbConnectionString))
        {
            connection.Open();
            string sql = "UPDATE users SET name = @name, age = @age WHERE id = @id";
            using (SQLiteCommand cmd = new SQLiteCommand(sql, connection))
            {
                cmd.Parameters.AddWithValue("@name", name);
                cmd.Parameters.AddWithValue("@age", age);
                cmd.Parameters.AddWithValue("@id", id);
                cmd.ExecuteNonQuery();
             }
       }
    }
    catch (Exception ex)
    {
        MessageBox.Show("Error updating data: " + ex.Message);
    }
    finally
    {
        ReadData(); // Refresh displayed data
    }
}
簡単ですが覚書としてSQLiteの操作の方法を記録しておきます。
後書き
最初のほうで
using (SQLiteConnection connection = new SQLiteConnection(dbConnectionString))
{
    try
    {
        connection.Open();
        // DB操作
    }
    finally
    {
        connection.Close(); // 不要。Dispose() が自動で呼ばれる。
    }
}
connection.Close();やconnection.Dispose();を書いていたのだけど
これはusingで自動的に閉じられるので不要なのでコメントアウトとしました。
何気なくCopilotでAIに質問したら「冗長で不要」と怒られました・・・
書いても特に問題がないと思っていたのですが・・・
以下の様な答えでした。
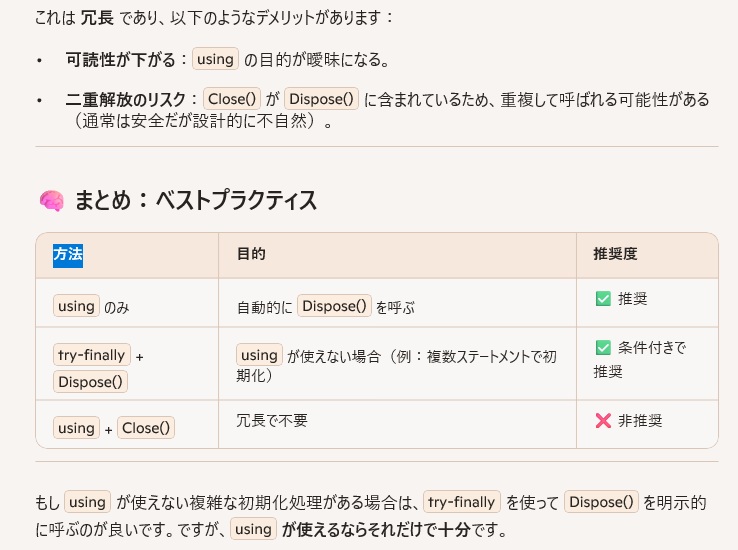
いやあ難しい。
Related Posts